Fastest route
You have finished artwork
Send vector art with the colour references. We digitise it, produce a free artwork proof, and sample before anything is cut.
Send artworkStart Here
Every custom cap is assembled from decisions, not picked off a shelf. This page is the entry point: find where you are starting from, see the dimensions and decoration routes behind it, and follow the order through to an approved sample.
The route through the order depends on what you already have, not on the size of the order.
Fastest route
Send vector art with the colour references. We digitise it, produce a free artwork proof, and sample before anything is cut.
Send artworkMost common
Send a sketch, a photo or a competitor sample. We work it into a production-ready design and confirm the construction before quoting.
See decoration optionsRepeat or replicate
Send the cap. We read the panel count, crown, bill, closure, fabric and decoration from it, then confirm what we can match and what has to change.
How matching worksEmbroidery Guidelines
The chart beside this text is the reference we use when we review artwork. It shows where a mark can sit on the front panel and how large it can be before it runs into the seam or the button. Placement is a decision rather than a detail: the same logo reads as corporate or as merchandise depending on how much of the panel it fills.
Direct embroidery and embroidered patches both follow this chart. A patch sits front centre, front left or front right; any additional direct embroidery is placed against the same limits rather than on top of the patch.
Send vector artwork with your colour references where you have them. Vector keeps the first sewout close to what you designed; raster files can be worked from, but they add a step and can change how fine detail resolves. Digitising and the artwork proof are free, and there is no set-up fee.
You approve the mark before anything is cut — either a virtual sewout by email, or a photograph of the physical sample. Production then follows the approved sample, not the mockup.
Logo and artwork guide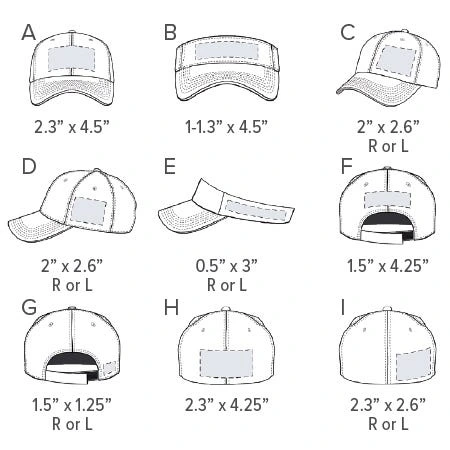
Decoration Placement
A cap has more usable surface than most buyers expect. These are the thirteen positions we place marks in, and what each one is normally used for.
Front centre
The default and the widest flat area. Carries the largest mark.
Front left
A smaller mark beside the front panel seam.
Front right
The mirror of front left. Pairs with it on a two-mark brief.
Left temple
The side panel. Usually a secondary mark.
Right temple
The mirror of the left temple.
Back left
Above or beside the closure.
Back right
The mirror of back left.
Back centre
The back arch. Common for a name, a size or a repeat logo.
Back strap
On the strap or the closure itself.
Left top visor
On the upper surface of the bill.
Right top visor
The mirror of the left top visor.
Centre top visor
Across the middle of the bill, above the edge.
Undervisor
The underside of the bill — visible when the bill is turned up.
Combining several positions is normal on a retail or team program — a front mark plus a back arch, or a logo on the bill as well. One thing to plan for: each additional hit is a separate operation on the cap, so a brief with many positions takes longer to run than a single front mark. Decide the full set at the artwork stage rather than adding positions one at a time later.
See every decoration route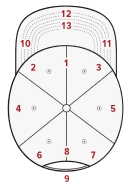
These are the reference pages behind every quote we send. Read them in order, or jump to the one that matches the question you have now.
01
The dimensions a custom cap is actually built from — crown, structure, closure, fabric, bill and application.
Specify By02
Every decoration route we run: embroidery styles, patch types, printing, edge finishes and placement.
Decoration Options03
The specification charts buyers quote from, plus every component option from buttons to labels.
Cap Specifications04
How the sample is made, what gets approved, and what happens between approval and bulk.
Sample Process05
File formats, artwork rules, logo sizes and placement — so the first proof is close to right.
Logo & Artwork GuideRetail-ready caps built as your product, not as merchandise.
For brands →Volume orders quoted by the specification, with tiered pricing by quantity.
Wholesale →Your brand on the product and the packaging, not only on the front panel.
Private label →Undecorated caps for shops that run their own decoration.
Blank caps →One size covering a wide range of heads, and reorders that match.
Corporate →Named runs, size ranges and dated delivery.
Teams →Minimums are confirmed by style, colour, decoration method, packaging and quantity rather than quoted as one number. Send the brief and we will state the minimum for your actual specification instead of a generic figure that may not apply.
The logo file, the cap style or a reference photo, the colourway and the quantity. Anything you have not decided, we will recommend and explain. Vector artwork produces the closest first proof, but raster files can be worked from.
Yes. Send a physical sample or photographs of the front, side, back and inside. We read the panel count, crown height, bill shape, closure, sweatband and decoration from it, then confirm what we can match and what has to change.
Always. The artwork proof comes first, then a physical sample for your approval. Nothing goes to bulk until the sample is signed off, and bulk follows the approved sample.
Yes, and it is common. Mixed styles usually still count as one order when they share the same logo and colour palette. The minimum is confirmed per style so you know what each shape needs.
From our factory in China. Shipping terms are quoted per order, and pre-shipment photographs go out before dispatch so you know what left the building.
We reply with a free artwork proof and a factory-direct quote. Sample approval comes before bulk production, and pre-shipment photographs go out before dispatch.